Using Rufus
In our modern digital era, having a multiboot USB drive has become increasingly valuable. It offers the convenience of booting into various operating systems
and tools from a single USB drive. This is especially beneficial for IT experts, system administrators, and those dealing with multiple operating systems.

In this guide, we'll dive into the process of utilizing Rufus to create a multiboot USB for Windows 7, 8, 10, and 11. Stay tuned for step-by-step instructions. Next,
let's start by looking at what multiboot USB is and the benefits of creating multiboot USB with Rufus.
and tools from a single USB drive. This is especially beneficial for IT experts, system administrators, and those dealing with multiple operating systems.

In this guide, we'll dive into the process of utilizing Rufus to create a multiboot USB for Windows 7, 8, 10, and 11. Stay tuned for step-by-step instructions. Next,
let's start by looking at what multiboot USB is and the benefits of creating multiboot USB with Rufus.
How to Create Multiboot USB for Windows 7/8/10 using Rufus
Rufus, an acclaimed open-source tool, is widely recognized for its ability to
effortlessly and swiftly from ISO files. It supports a range of operating systems like Windows, Linux, and FreeBSD.
Among Rufus's standout features is its remarkable capability to generate a multiboot USB drive. With its built-in functionality, you can easily add multiple ISO files to a single USB drive, enabling you to boot into various operating systems or tools seamlessly. This makes Rufus an invaluable tool for those seeking versatility and convenience in their USB booting experience. Let's walk through the steps to know how to use Rufus to create multiboot USB:
Step 1. Download and install
on your computer and connect your USB drive to your computer. Then, open Rufus and choose your USB drive from the device list.
Step 2. From the Boot selection drop-down menu, select Multiboot as the option.
Step 3. Click the Add button and choose the ISO files you wish to include on the USB drive.
Step 4. Hit the Start button to initiate the creation process of the multiboot USB drive.
Once the process finishes, you can boot your computer from the USB drive and select the desired operating system or tool.
Now that you know how to create multiboot USB containing Windows 7 and 8 and 10 by Rufus, let's take a look at an easier way to create bootable USB.
Rufus, an acclaimed open-source tool, is widely recognized for its ability to effortlessly and swiftly from ISO files. It supports a range of operating systems like Windows, Linux, and FreeBSD.
Among Rufus's standout features is its remarkable capability to generate a multiboot USB drive. With its built-in functionality, you can easily add multiple ISO files to a single USB drive, enabling you to boot into various operating systems or tools seamlessly. This makes Rufus an invaluable tool for those seeking versatility and convenience in their USB booting experience. Let's walk through the steps to know how to use Rufus to create multiboot USB:
Step 1. Download and install on your computer and connect your USB drive to your computer. Then, open Rufus and choose your USB drive from the device list.
Step 2. From the Boot selection drop-down menu, select Multiboot as the option.
Step 3. Click the Add button and choose the ISO files you wish to include on the USB drive.
Step 4. Hit the Start button to initiate the creation process of the multiboot USB drive.
Once the process finishes, you can boot your computer from the USB drive and select the desired operating system or tool.
Now that you know how to create multiboot USB containing Windows 7 and 8 and 10 by Rufus, let's take a look at an easier way to create bootable USB.
Create Bootable USB for Windows 7/8/10/11 - Easiest Way
Apart from Rufus, there are other third-party tools you can explore for creating bootable USB drives. is my top recommendation as it is widely regarded as the best free boot media creator available. By utilizing this software, you gain the ability to create bootable USB drives not only for your current computer but also for other PCs. And bootable disks created by this software are backward compatible so that bootable disks created in Win 11 can be used in Win 11/10/8/7!
It serves as a swift solution for tackling startup issues, including resolving errors or overcoming boot failures. AOMEI Backupper Standard offers numerous advantages and functionalities, such as:

AOMEI Backupper
Free Bootable USB Creator
- Bootable media creation - This software supports the creation of bootable USB drives, CD/DVDs, or simple ISO files, providing flexible options for your needs.
- Wide compatibility - It is compatible with all Windows PCs, including Windows 11/10/8/7, supporting both 32-bit and 64-bit versions and seamlessly works with BIOS and UEFI modes, eliminating any file system limitations you may encounter.
- Complete backup - Beyond its bootable media creation capabilities, this tool offers comprehensive data protection features. You can create , disk backups, file backups, and partition backups effortlessly.
- Various destinations - It also provides the flexibility to back up your data to various locations, including local disks, external hard drives, network shares, and even cloud storage.
Begin by downloading the freeware and installing it on your system.
I think It will be much safer to search for it on this site.
Review AOMEI Backupper is an efficient, reliable, professional backup and recovery software designed to assist a user in creating disk, partition, and system backups, which can quickly restore a user's computer to a previous state of stability in case of emergency. It lets users securely backup...
The upload.ee link works.
Description: AOMEI Backupper is a professional-like, easy-to-use backup and recovery software. But is free for home users and commercial use, fully protects your computer from data loss. It lets you securely backup PC and Server, provides one-click backup your system partition or disk and does...
Step 1. Open the program and navigate to the Tools tab. From there, select the Create Bootable Media option to proceed.

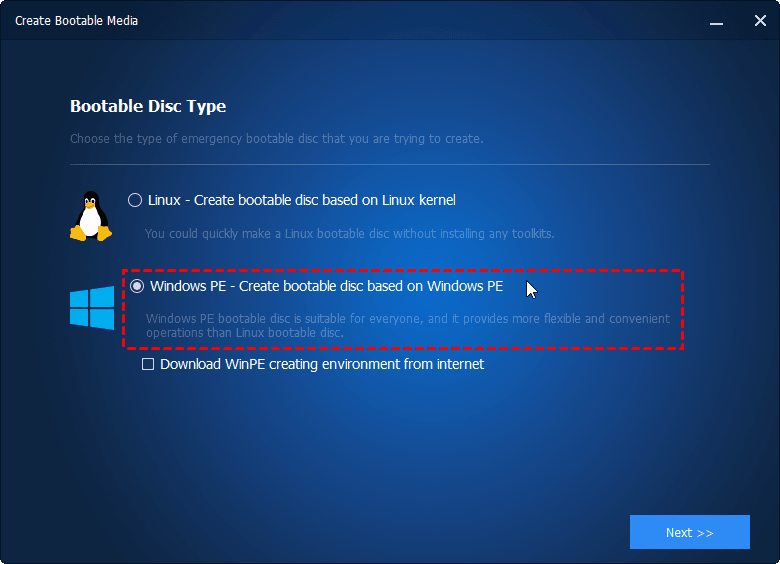
Step 2. Choose the Bootable Disc Type. It is advisable to select Windows PE as it provides a broader range of options and caters to a wider audience compared to Linux.

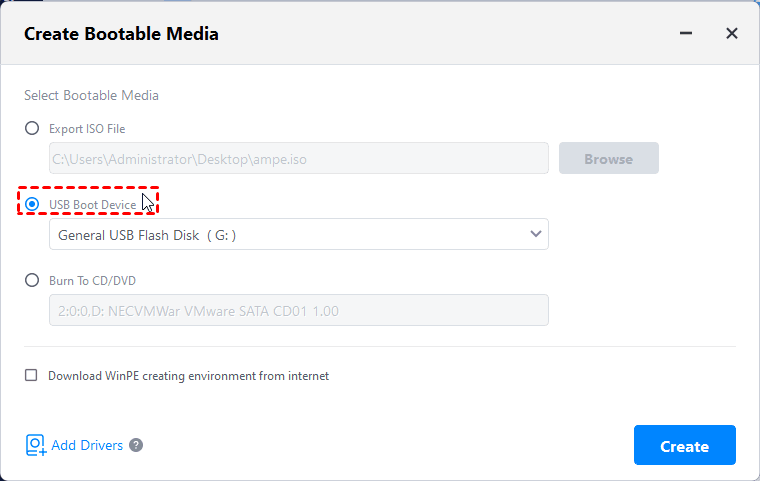
Step 3. Select the USB Boot Device option and click Next to proceed. Allow some time for the process to complete, and once finished, click on Finish to finalize the procedure.

Tip: In case you don't have a USB or CD/DVD at your disposal, an alternative option is to enable the AOMEI recovery environment boot feature once you upgrade to AOMEI Backupper Professional.
This feature operates similarly to bootable media, but with the limitation of being specific to the current computer.
FAQs about Rufus Multiboot USB
#1. How long does Rufus take to make a bootable USB?
The time it takes for Rufus to create a bootable USB drive depends on several factors, including the size of the ISO file you're using, the speed of your USB drive, and the performance of your computer.
For larger operating systems like Windows, it can take 15-30 minutes or more, depending on factors such as the USB drive's write speed and the complexity of the operating system.
#2. Can I add multiple operating systems to a single Rufus Multiboot USB?
Yes, Rufus supports creating a Multiboot USB with multiple operating systems, allowing you to boot and install different OSes from a single USB drive.
#3. Does Rufus support UEFI boot for Multiboot USBs?
Yes, Rufus allows you to create Multiboot USBs that support both legacy BIOS and UEFI boot methods.
#4. How do I troubleshoot issues if one of the operating systems doesn't boot from the Rufus Multiboot USB?
Verify the compatibility of the ISO, check the boot order configuration, and ensure the Multiboot USB is properly created. You may need to adjust settings or try recreating the USB.
